An Assembly Language
I.D.E. To Engage Students Of All Levels
* A Tutorial *
2007
CCSC: Central Plains Conference
Pete Sanderson, Otterbein College, PSanderson@otterbein.edu
Ken Vollmar, Missouri State University, KenVollmar@missouristate.edu
MARS is a software simulator for the MIPS assembly language intended
for educational use. We will explore the capabilities of MARS release
3.2.1 in this three part tutorial.
MARS may be downloaded from www.cs.missouristate.edu/MARS.
Part 1 : Basic MARS Use
The example program is Fibonacci.asm
to compute everyone’s favorite number sequence.
Start MARS from the Start menu or desktop icon.
Use the menubar File…Open or the Open icon
 to open Fibonacci.asm in the default folder. (All icons have
menubar equivalents; the remainder of these steps will use the icon
whenever possible.)
to open Fibonacci.asm in the default folder. (All icons have
menubar equivalents; the remainder of these steps will use the icon
whenever possible.)
The provided assembly program is complete. Assemble the program
using the icon

Identify the location and values of the program’s initialized
data. Use the checkbox to toggle the display format between decimal
and hexadecimal
 .
.
The nineteen-element array fibs
is initialized to zero, at addresses 0x10010000 … 0x10010048.
The data location size
has value 19ten at 0x1001004c.
The addresses 0x10010050 … 0x1001006c contain null-terminated
ASCII strings.
Use the checkbox to toggle the display format between decimal and
hexadecimal,
.
Use the Settings menu to configure the MARS displays. The settings
will be retained for the next MARS session.
The Labels display contains the addresses of the assembly code
statements with a label, but the default is to not show this
display. Select the checkbox from the Settings menu.

Select your preference for allowing pseudo-instructions
(programmer-friendly instruction substitutions and shorthand).
Select your preference for assembling only one file, or many
files together (all the files in the current folder). This feature
is useful for subroutines contained in separate files, etc.
Select the startup display format of addresses and values (decimal
or hexadecimal).
Locate the Registers display, which shows the 32 common MIPS
registers. Other tabs in the Registers display show the
floating-point registers (Coproc 1) and status codes (Coproc 0).
Use the slider bar to change the run speed to about 10 instructions
per second.
 This allows us to “watch the action” instead of the assembly
program finishing directly.
This allows us to “watch the action” instead of the assembly
program finishing directly.
Choose how you will execute the program:
The
 icon runs the program to completion. Using this icon, you should
observe the yellow highlight showing the program’s progress and
the values of the Fibonacci sequence appearing in the Data Segment
display.
icon runs the program to completion. Using this icon, you should
observe the yellow highlight showing the program’s progress and
the values of the Fibonacci sequence appearing in the Data Segment
display.
The
 icon resets the program and simulator to initial values. Memory
contents are those specified within the program, and register
contents are generally zero.
icon resets the program and simulator to initial values. Memory
contents are those specified within the program, and register
contents are generally zero.
The
 icon is “single-step.” Its complement is
 ,
“single-step backwards” (undoes each operation).
,
“single-step backwards” (undoes each operation).
Observe the output of the program in the Run I/O display window:
The
        Fibonacci numbers are:
1
        1 2 3 5 8 13 21 34 55 89 144 233 377 610 987 1597 2584 4181
--
        program is finished running --
Modify the contents of memory. (Modifying a register value is
exactly the same.)

Reset
and re-run
the program, which stops at the breakpoint.
Double-click in one of the memory locations containing the computed
Fibonacci numbers. The cell will be highlighted and will accept
keyboard entry, similar to a spreadsheet. Enter some noticeably
different value, and use the Enter key or click outside the cell to
indicate that the change is complete. Example: Memory address
0x10010020 = 268501024 ten presently
contains data 0x00000022 = 34 ten.
Click
to continue from the breakpoint. The program output includes your
entered value instead of the computed Fibonacci number.
Open the Help
 for information on MIPS instructions, pseudoinstructions,
directives, and syscalls.
for information on MIPS instructions, pseudoinstructions,
directives, and syscalls.
Modify the program so that it prompts the user for the Fibonacci
sequence length.
Select the Edit tab in the upper right to return to the program
editor.

The MIPS comment symbol is #. All characters on the line after the
character # are ignored.
Un-comment lines 12-19. The newly exposed program fragment will
prompt the user for the length of the Fibonacci sequence to
generate, in the range
 .
(The length of the sequence must be limited to the size of the
declared space for result storage.)
.
(The length of the sequence must be limited to the size of the
declared space for result storage.)
Determine the correct syscall
parameter to perform “read integer” from the user, and insert
the parameter at line The correct syscall
parameter may be found at Help
… Syscall tab…read integer service. The completed line will have
the form li
$v0, 42 (where in this case 42 is not the right
answer).
Reset
and re-run
the program. The program will stop at the breakpoint you inserted
previously. Continue and finish with
.
Part 2 : MARS Tools
You may have noticed that MARS has a Tools menu. The
capabilities provided through this menu really catapult MARS into a
different league of computer science educational software.
We call each of the items in the Tools menu a MARS Tool. A MARS Tool
is best described as a pop-up application that observes MIPS memory
and/or register activity during MIPS program execution then
communicates that activity to the tool user to serve a particular
purpose. This is best seen by example.
MARS Tools Activity 1 :
Running the Data Cache Simulator tool
Close any MIPS programs you are currently using.
Open the program row-major.asm
from the Examples folder.
This program will traverse a 16 by 16 element integer matrix in
row-major order, assigning elements the values 0 through 255 in
order. It performs the following algorithm:
            for (row = 0; row < 16; row++)

            for (col = 0; col
            < 16; col++)

            data[row][col] = value++;
Assemble the program.
From the Tools menu, select Data Cache Simulator. A
new frame will appear in the middle of the screen.

This is a MARS Tool that will simulate the use and performance of
cache memory when the underlying MIPS program executes. Notice its
three major sections:
Cache Organization: You can use the combo boxes to specify
how the cache will be configured for this run. Feel free to
explore the different settings, but the default is fine for now.
Cache Performance: With each memory access during program
execution, the simulator will determine whether or not that access
can be satisfied from cache and update the performance display
accordingly.
Tool Control: These buttons perform generic control
functions as described by their labels.
Click the tool's Connect to MIPS button. This causes the
tool to register as an observer of MIPS memory and thus respond
during program execution.
Back in MARS, adjust the Run Speed slider to 30 instructions
per second. It is located at the right side of the toolbar. This
slows execution so you can watch the Cache Performance animation.

In MARS, run the program using the Run toolbar button
, the menu item or keyboard shortcut. Watch the Cache Performance
animate as it is updated with every access to MIPS memory.
What was the final cache hit rate? _____________. With each
miss, a block of 4 words are written into the cache. In a row-major
traversal, matrix elements are accessed in the same order they are
stored in memory. Thus each cache miss is followed by 3 hits as the
next 3 elements are found in the same cache block. This is followed
by another miss when Direct Mapping maps to the next cache block,
and the patterns repeats itself. So 3 of every 4 memory accesses
will be resolved in cache.
Given that explanation, what do you predict the hit rate will be
if the block size is increased from 4 words to 8 words?
______________. Decreased from 4 words to 2 words?
___________.
Verify your predictions by modifying the block size and re-running
the program from step 7.
NOTE: when you modify the
Cache Organization, the performance values are automatically reset
(you can always use the tool's Reset button).
NOTE:
You have to reset
the MIPS program before you can re-run it.
NOTE: Feel
free to adjust the Run Speed slider to maximum speed anytime
you want.
Repeat steps 2 through 10 for program column-major.asm
from the Examples folder.
This program will traverse a 16 by 16 element integer matrix in
column-major order, assigning elements the values 0 through 255 in
order. It performs the following algorithm:
            for (col = 0; col < 16; col++)

            for (row = 0; row
            < 16; row++)

            data[row][col] = value++;
NOTE:
You can leave the Cache Simulator in place, move it out of the way,
or close it. It will not interfere with the actions needed to open,
assemble, or run this new program and will remain connected to MIPS
memory. If you do not close the tool, then skip steps 4 and 5.
What was the cache performance for this program?
____________. The problem is the memory locations are now accessed
not sequentially as before, but each access is 16 words beyond the
previous one (circularly). With the settings we've used, no two
consecutive memory accesses occur in the same block so every access
is a miss.
Change the block size to 16. Note this will reset the tool.
Create a second instance of the Cache Simulator by once again
selecting Data Cache Simulator from the Tools menu.
Adjust the two frames so you can view both at the same time.
Connect the new tool instance to MIPS, change its block size to 16
and change its number of blocks to 16.
Re-run the program. What is the cache performance of the
original tool instance? ____________. Block size 16 didn't
help because there was still only one access to each block, the
initial miss, before that block was replaced with a new one. What
is the cache performance of the second tool instance?
____________. At this point, the entire matrix will fit into cache
and so once a block is read in it is never replaced. Only the first
access to a block results in a miss.
In what courses might an exercise like this one be useful for your
students? I have used a variation on this exercise as a student
exercise in Operating Systems, and for a lecture illustration of the
cache concept in Otterbein's CS 0 course, "The Scope of Computer
Science".
MARS Tools Activity 2 :
Running the Cache Simulator as a stand-alone
In command mode, traverse to the directory containing Mars.jar and
enter the command:
java
    -classpath  Mars.jar  mars.tools.CacheSimulator
The cache simulator tool is launched. Its Tool Control section is
replaced by Application Control, which contains additional controls
for loading, assembling and running MIPS programs. It uses MARS'
MIPS assembler and runtime simulator in the background to control
MIPS execution.
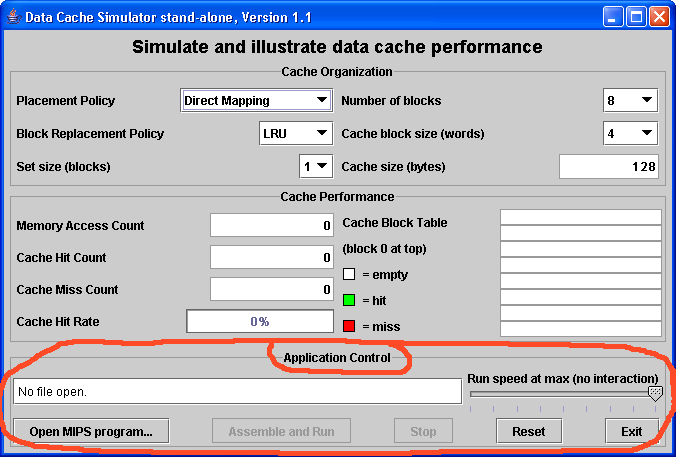
Click the Open MIPS program button and a File Open dialog
will pop up. Browse to and select a MIPS program to run. Select
row_major.asm
again if you wish.
The Assemble and Run button is now enabled. Click it to
assemble and run the program. The animation will be very rapid.
Use the Run Speed slider to adjust the running speed, click
the Reset button then click Assemble and Run again.
While the program is running, the Stop button is enabled.
Program status is updated in the single line text field.
We plan to implement a small MARS Tool Suite application to simplify
the selection and launching of tools such as the Cache Simulator that
are capable of running outside the MARS integrated development
environment.
MARS Tools Activity 3 : The
Memory Reference Visualization tool
Open the program row-major.asm
from the Examples folder
if it is not already open.
Assemble the program.
From the Tools menu, select Memory Reference
Visualization. A new frame will appear in the middle of the
screen.
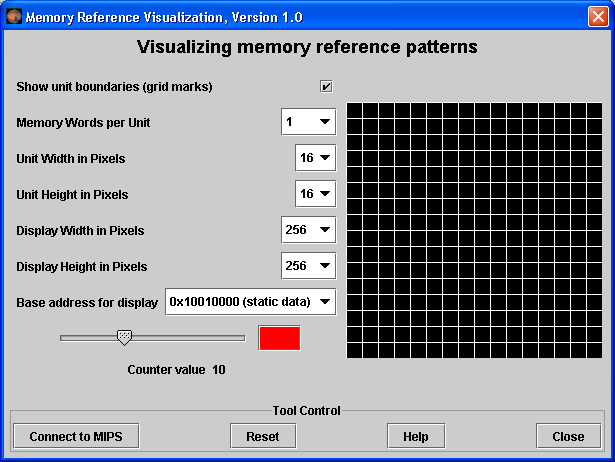
This tool will paint a grid unit each time the corresponding MIPS
memory word is referenced. The base address, the first static data
segment (.data directive)
word, corresponds to the upper-left grid unit. Address
correspondence continues in row-major order (left to right, then next
row down).
The color depends on the number of times the word has been
referenced. Black is 0, blue is 1, green is 2, yellow is 3 and 4,
orange is 5 through 9, red is 10 or higher. View the scale using the
tool’s slider control. You can change the color (but not the
reference count) by clicking on the color patch.
Click the tool's Connect to MIPS button. This causes the
tool to register as an observer of MIPS memory and thus respond
during program execution.
Back in MARS, adjust the Run Speed slider to 30 instructions
per second.
Run the program. Watch the tool animate as it is updated with every
access to MIPS memory. Feel free to stop the program at any
time.
Hopefully you observed that the animation sequence corresponded to
the expected memory access sequence of the row-major.asm program.
If you have trouble seeing the blue, reset the tool, move the
slider to position 1, change the color to something brighter, and
re-run.
Repeat steps 2 through 7, for column-major.asm.
You should observe that the animation sequence corresponded to the
expected memory access sequence of this program.
Repeat again for fibonacci.asm
to observe the animated pattern of memory references. Adjust the
run speed and re-run if necessary.
(Optional) Create a new instance of the Data Cache Simulator.
Move the two frames around so you can see both. Connect the cache
simulator to MIPS and reset the Memory Reference Visualization.
Re-run the program. This exercise illustrates that two different
tools can be used simultaneously.
The Memory Reference Visualization tool could be useful in an
operating systems course to illustrate spatial and temporal locality
and memory reference patterns in general.
Part 3 : Extending MARS
Capabilities
Our session today is not long enough for interactive activities in
this area, but we’ll provide you with enough detail that you can
pursue them on your own if you desire.
Abstract
MARS
can be customized and extended in four different ways: (1) writing
new MARS Tools, (2) writing new MIPS system calls, (3) writing new
MIPS pseudo-instructions, and (4) writing new MIPS basic
instructions. Techniques for all four are described here.
|
You have the ability to extend and customize certain MARS
capabilities to make it more useful in your courses. This document
describes four different techniques for extending MARS capabilities:
Ability to write MARS Tools for inclusion in the Tools menu and
stand-alone use.
Ability to define and add new system calls for subsequent use by
MIPS programs.
Ability to customize the instruction set by adding, removing or
modifying pseudo (macro) instruction specifications.
Ability to customize the basic instruction set by adding, removing
or modifying basic instruction specifications.
These procedures apply to MARS 3.2.1, released January 2007. Some
may be streamlined in future releases.
The ability to define and plug in new MARS Tools will be used to
develop new learning aids for students in a variety of computer
science courses and provide micro-worlds for assembly language
students to target in their projects. Through those tools it is
possible to deeply engage students in both settings.
The ability to modify the set of system calls, basic instructions,
and pseudo-instructions can be used to define a complete instruction
set for an alternative RISC architecture. MARS was not designed with
this in mind however, so support is uneven. For example, instruction
syntax analysis and code generation is driven by the example and
template provided with each instruction, whereas lexical analysis
such as the recognition of register names is embedded in program
logic and cannot easily be modified. A customized instruction set
has to use MIPS conventions for labeling, register naming, and so
forth. Hopefully MARS can be refactored in future releases to
facilitate its use for alternative instruction sets.
1. Writing your own MARS
Tool and plugging it into MARS
Abstract
If you
think MARS Tools like the Cache Simulator are cool then why not
develop your own? There are two different ways to do so: (1)
write a class that implements the MarsTool interface and is
launched from the Tools menu in MARS, or (2) write a class that
extends the AbstractMarsToolAndApplication class and runs either
from the Tools menu or as a free-standing application. You can
also write a free-standing application that uses the Mars API.
|
This section describes two different techniques for developing your
own MARS Tool.
Write a class that implements the mars.tools.MarsTool
interface and keep it in the mars.tools
package. It will automatically be added to the Tools menu
the next time MARS is run and launched when its menu item is
selected.
Write a class that extends mars.tools.AbstractMarsToolAndApplication
and keep it in the mars.tools
package. It will automatically be added to the Tools menu
the next time MARS is run and launched when its menu item is
selected. It can also be launched from outside MARS as a
free-standing Java application that uses the Mars API to control the
assembly and execution of MIPS programs.
It is also possible to write your own application from scratch using
the Mars API. This should be considered only for very specialized
applications and should be undertaken with great care. The
AbstractMarsToolAndApplication
class provides full support for assembling and running MIPS programs
in the background and is the preferred approach.
MyTool
            implements MarsTool
approach
Extract the MARS distribution from its JAR file. The JAR file does
not have an outermost folder to contain everything, so you'll want
to create one and extract it into that folder.
Develop your class in the mars.tools
package (mars/tools
folder).
Your class must implement the MarsTool
interface, which is in that package. This has only two methods:
String getName() to
return the name to be displayed in its Tools menu item, and void
action() which is invoked when that menu item is selected by
the MARS user. These will assure its inclusion in the Tools menu
when MARS is launched.
The user interface should be based on the javax.swing.JDialog
class. The tool interacts with simulated MIPS memory and registers
through the mars.mips.hardware.Memory
and mars.mips.hardware.Register
classes, both of which extend java.util.Observable.
The Memory class provides several addObserver() methods that permit
an Observer to register for selected memory addresses or ranges.
Javadoc-produced documentation is available in the doc
folder of the MARS distribution.
After successful compilation, MARS will automatically include the
new tool in its Tools menu.
MyTool
            extends
AbstractMarsToolAndApplication
approach
A better alternative is to extend the AbstractMarsToolAndApplication
class, which is also in the mars.tools package. By doing so, you get
the following elements:
ability to run either from the Tools menu or as a free-standing
application
basic user interface JDialog with Tool Control section (for tools)
basic user interface JFrame with Application Control section (for
applications)
basic user interface layout (BorderLayout) and rendering algorithm
basic MIPS memory and register observer capabilities
Extract the MARS distribution from its JAR file if you have not
already done so.
Develop your class in the mars.tools
package (mars/tools
folder).
Your class must extend the AbstractMarsToolAndApplication
abstract class, which is in that package. Nineteen of the 21
methods in this class have default implementations.
Define at least the two abstract methods: String
getName() to return the tool’s display name, and
JComponent
                        buildMainDisplayArea()
to construct the central area of the
tool’s graphical user interface. It will automatically be placed
in the CENTER of a BorderLayout, with title information to its
NORTH and tool control buttons to its SOUTH. Several
addAsObserver() methods are available for registering as a memory
and/or register observer.
Override additional methods as desired. Some do nothing by
default.
After successful compilation, MARS will automatically include the
new tool in its Tools menu.
To run it as a stand-alone application, you either need to add a
main()
to create the tool object and call its go()
method or write a short external application to do the same.
For a better idea of the GUI elements that come with this abstract
class, launch MARS and select Introduction to Tools from the
Tools menu.

|
By extending the provided abstract class
AbstractMarsToolAndApplication,
you get everything in this figure except the scrolled JTextArea
displayed in the center.
You
build the main user interface of your tool by defining the
inherited abstract buildMainDisplayArea()
method. This method returns a JComponent
that will automatically be displayed in the center of the default
BorderLayout.
Javadoc-produced
documentation of the AbstractMarsToolAndApplication
class is available in the doc
folder of the MARS distribution.
Source
code files for the MARS Tools are included together with their
bytecode files in the mars/tools
folder. Feel free to refer to them. All MARS source files,
including tools, are included in the src
folder.
|
If you develop a nifty MARS Tool, feel free to send it to us and with
your permission we'll post it on the MARS web site for others to use!
2. Writing a system call
(syscall) and plugging it into MARS
Abstract
MIPS
System calls are functions that interface with the operating
system to perform I/O and related operations. They are accessible
to MIPS assembly programs through service numbers and the syscall
instruction. MARS provides the 17 system calls documented in
Computer Organization and Design Third Edition, but you can
develop and add your own by writing a class that implements the
Syscall interface or extends the AbstractSyscall class.
|
MIPS system calls perform operating system functions and input/output
operations in particular. A system call is used in MIPS assembly by
loading its identifier (an integer) into register $v0, loading any
required arguments into registers as specified by the call's
protocol, then issuing the syscall
instruction.
MARS supports the MIPS system call specifications given in Appendix A
of Patterson and Hennessy's Computer Organization and Design Third
Edition. This appendix is freely available on the web at
http://www.cs.wisc.edu/~larus/HP_AppA.pdf.
MARS provides all 17 of the system calls specified there.

MySystemCall
            implements Syscall
approach
Extract the MARS distribution from its JAR file, if you have not
done so.
Develop your class in the mars.mips.instructions.syscalls
package (mars/mips/instructions/syscalls
folder).
Your class must implement the Syscall
interface, which is in that package. This has four methods: String
getName() to return an assigned name for this service,
setNumber() and
getNumber() to set and
get its associated service number, and simulate()
to simulate the execution of the system call at MIPS runtime.
After your class compiles successfully, it will be automatically
plugged in and available to MIPS programs the next time you launch
MARS.
MySystemCall
            extends AbstractSyscall
approach
Extract the MARS distribution from its JAR file, if you have not
done so.
Develop your class in the mars.mips.instructions.syscalls
package (mars/mips/instructions/syscalls
folder).
Your class must extend the AbstractSyscall
class, which is in that package. It provides a constructor and
defines the three Syscall
getter and setter methods. The simulate()
method is abstract so you must define that yourself.
After your class compiles successfully, it will be automatically
plugged in and available to MIPS programs the next time you launch
MARS.
Additional Information
Implementation of the simulate()
method may require access to one or more simulated MIPS memory and
register objects. The pertinent classes are
mars.mips.hardware.Memory
and mars.mips.hardware.RegisterFile.
Also study the source code of existing system calls. Source code
files for the 17 MARS system calls are located in the src
folder. Follow the folder hierarchy mars/mips/instructions/syscalls.
The MARS distribution includes a text file Syscall.properties
which you can edit to override any system service number assigned in
a constructor. This allows you to change number assignments without
re-compiling any Java source files.
The Syscalls help page is static at this time so it will not
reflect any additional system calls or renumbering.
If you develop a nifty system call, please send it to us and with
your permission we'll post it on the MARS web site for others to
access!
We have had philosophical discussions concerning the development of
additional system calls and so far have resisted doing so. On one
hand, it would be very useful to have a small library of handy
functions such as random number generators available through the
syscall mechanism. On the other hand, such functions are not
considered operating system operations that would be performed in
kernel mode and it would be misleading to infer such status. Let us
know what you think!
3. Modifying the set of
pseudo (extended, macro) instructions
Abstract
To
define a new pseudo-instruction, edit the PseudoOps.txt
file included in the MARS distribution. The instruction
specification is one line long and consists of a tab-separated
list containing an example usage of the instruction followed by
the one or more basic instructions that the assembler will expand
it to. Use specification language symbols to control the
substitution of program statement operands into the generated
basic instruction(s).
|
The MIPS instruction set includes a large number of
pseudo-instructions. These are instructions that follow MIPS
instruction syntax specifications but are not directly supported by
the MIPS architecture. They are instead expanded into a sequence of
one or more basic instructions by the assembler. For this reason
they are sometimes called macro instructions.
The classic example of a pseudo-instruction is la,
or load address. Here's an example:
la $t0, number
where number is the
label for a data item. A corresponding MIPS machine instruction
would have to include the operation code, the 5 bit register number
and the 32 bit address. But since machine instructions are only 32
bits long, this is not possible. It requires two instructions.
Pseudo-instructions are provided entirely for the programmer's
convenience, and MARS includes an assembler setting that will
disallow their use.
To modify the
pseudo-instruction set, follow this process:
Extract the MARS distribution from its JAR file if you have not
already done so.
Edit PseudoOps.txt
appropriately. Each pseudo-instruction and its macro expansion are
specified on one line in this file. Details below.
Launch MARS and test your instruction.
Here's an example specification, for the absolute value
instruction abs
abs
                    $1,$2
addu
                        RG1,$0,RG2
bgez
RG2,2 sub
RG1,$0,RG2


1
2
3
4
Example instruction use. This instruction takes two register
operands. The $1 and $2 represent generic registers and are used
only to generate a token sequence for syntax analysis. There is
no relationship between register references in the example
instruction (item 1) and register references in the macro expansions
(items 3 and 4)!
Each item in the specification must be separated by a single TAB
character. Only the first one is pointed out but there is also a
TAB between each of the remaining items.
The first instruction of the macro expansion. RG1 is a formal
parameter that will be replaced by the actual first register operand
of the statement being assembled. RG2 is similarly replaced by the
actual second register operand of the statement being assembled.
Second and third instructions of the macro expansion. Perform
similar substitutions.
Statement to assemble
|
Macro expansion
|
abs
                                $t3, $t4
|
addu
                                $t3, $0, $t4
bgez
                                $t4, 2
sub
                                $t3, $0, $t4
|
This example uses the simple substitutions RG1 and RG2. Other macro
substitution symbols are more complex, such as VL2P3
which means to substitute the low order 16 bits of the 32 bit value
in source operand 2 after adding 3 to it (used in the expansion of
certain unaligned loads and stores).
The macro substitution language is described in detail in the file
itself.
If you add any pseudo-instructions, they will automatically be
included in the instruction list produced by the Help feature's
Extended (pseudo) Instructions subtab. If the instruction
specification ends with a comment on the same line (# is the comment
marker, just like in MIPS), that comment will be included in the list
along with the example instruction use.
4. Modifying the set of
Basic Instructions
Abstract
It is
possible to modify the basic instruction set recognized by MARS.
This requires you to edit and re-compile the
mars.mips.instructions.InstructionSet
class. The specification of a basic instruction includes four
components: (1) an example of instruction use, (2) the instruction
format – R, I, or J, (3) a template for generating the 32 bit
machine code from a program statement, and (4) a method to
simulate the execution of that program statement.
|
This is the one type of MARS extension that requires re-compilation
of a standard MARS source file. Specifications for the MIPS basic
instruction set are contained in the
mars.mips.instructions.InstructionSet
class. Each specification follows the same format. Here is an
example, for the and
instruction that performs logical AND.

instructionList.add(new
        BasicInstruction(

"and
            $1,$2,$3",
1.
example use
BasicInstructionFormat.R_FORMAT,
2.
instruction format
"000000ssssstttttfffff00000100100",
3.
machine code template
new
            SimulationCode()
4.
execution simulator
{
public void
        simulate(ProgramStatement statement)
{
int[] operands =
        statement.getOperands();
RegisterFile.updateRegister(
operands[0],
RegisterFile.getValue(operands[1])
        &
RegisterFile.getValue(operands[2])
        );
}
}
));
The BasicInstruction
constructor takes four parameters, annotated on the example:
Example instruction use. This instruction takes three register
operands. The $1, $2 and $3 represent generic registers and are
used only to generate a token sequence for syntax analysis.
MIPS instruction format. MIPS defines the R-format (works with
registers), I-format (works with immediate value), and J-format
(jump instruction). MARS defines a second version of the I-format
called I-branch-format when the immediate value is used in a branch
instruction.
Machine code template. This String of length 32 consists of the
characters 0, 1,
f, s,
and t. When the MIPS
program statement syntactically matches this instruction, the 32 bit
machine code instruction is constructed by substituting low order
bits from the first operand for f,
low order bits from the second operand for s
and low order bits from the third operand for t.
The result is converted to 32 bit binary. This example has
register numbers which are 5 bits because MIPS32 defines 32 integer
registers.
Constructs the object whose simulate()
method will be called to simulate the execution of the program
statement at MIPS runtime. The object is constructed from an
anonymous subclass of the SimulationCode
class defined right here. The simulate()
method receives information about the program statement as a
parameter and manipulates MIPS registers and/or memory to carry out
the instruction.
To modify the basic
instruction set, follow this process:
Extract the MARS distribution from its JAR file if you have not
already done so.
Copy InstructionSet.java
from the src/mars/mips/instructions
folder into the mars/mips/instructions
folder.
Make a backup copy of InstructionSet.java
for safe keeping.
Edit InstructionSet.java
appropriately. Implementation of the simulate()
method will likely require access to one or more simulated MIPS
memory and/or register objects. The pertinent classes are
mars.mips.hardware.Memory
and mars.mips.hardware.RegisterFile.
Javadoc-generated documentation for all MARS classes is provided in
the distribution's doc
folder. Also study the source code of existing instructions.
Compile InstructionSet.java
and test your instruction.
NOTE: This technique applies to MARS release 3.2.1. It is
possible that the technique for specifying basic instructions will
change in a future release of MARS. If so, it would be converted to
a technique similar to that now used for system calls.